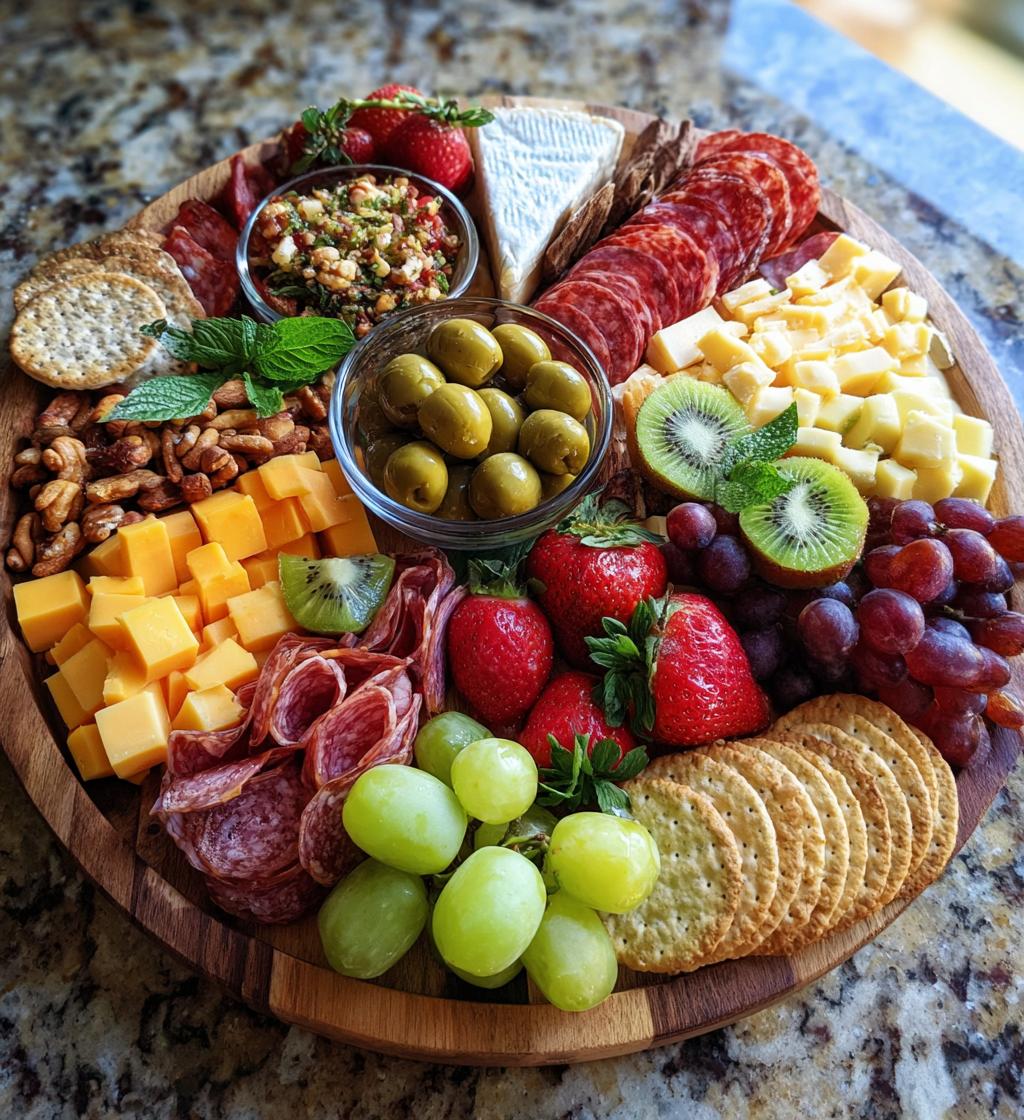
Spring is finally here, and that means it’s time to bring some vibrant colors and fresh flavors into our kitchens! I absolutely adore creating spring charcuterie boards because they’re not just meals; they’re an experience! Picture a beautiful board bursting with assorted cheeses, savory cured meats, and a rainbow of fresh fruits. It’s like a little slice of spring right on your table! The unique aspect of this recipe is how easily you can customize it with whatever seasonal goodies you find at the market. Plus, assembling it is a delightful way to spend some time with friends or family. You can mix and match textures and flavors, making each bite a delightful surprise. Trust me, everyone will be talking about your stunning spring charcuterie board at your next gathering—it’s such a fun and delicious way to celebrate the season! Let’s dive into the fun part: the ingredients!
Ingredients List
Getting the right ingredients is key to putting together a stunning spring charcuterie board that everyone will love. Here’s what you’ll need:
- 1 cup assorted cheeses (diced cheddar, sliced brie, cubed gouda)
- 1 cup cured meats (thinly sliced salami, prosciutto, and chorizo)
- 1 cup fresh fruits (halved strawberries, whole grapes, and sliced kiwi)
- 1 cup assorted nuts (whole almonds and walnut halves)
- 1 cup crackers or breadsticks (your choice of flavor)
- 1/2 cup olives (pitted, any variety you like)
- 1/2 cup hummus or your favorite dip (for a creamy addition)
- Fresh herbs (mint and basil) for garnish, adding that lovely spring touch
Feel free to mix and match ingredients based on your preferences or what’s available in your pantry. The more colorful and diverse, the better! Your board will look and taste fabulous with these delightful selections.
How to Prepare Spring Charcuterie Board Ideas
Creating a spring charcuterie board is all about the joy of assembly and presentation! I like to think of it as an art project where the delicious ingredients are my colors. To make the process smooth and enjoyable, let’s break it down into simple steps. And remember, having everything prepped and ready to go makes all the difference!
Gather Your Ingredients
Before you start, take a moment to gather all your ingredients. Trust me, this little prep step saves you from running back and forth to the fridge! Lay everything out on your counter or table to see what you have. It’s like setting the stage for a beautiful performance! Make sure you have your cheeses, meats, fruits, nuts, and dips ready to go. This way, you can focus on the fun part—arranging your board!
Arrange the Cheeses
Now, let’s get to the fun part: arranging the cheeses! I like to start by placing the cheeses in different sections of the board. Don’t worry about being perfect; just make it visually appealing! You can cube the gouda, slice the brie into wedges, and scatter the cheddar around. This helps create height and dimension, making your board look inviting. Plus, each cheese adds its own unique flavor that complements the other ingredients!
Add Cured Meats
Next, it’s time to add the cured meats. I usually place them right next to the cheeses for a beautiful contrast. You can fold the slices of salami and prosciutto into pretty little rosettes or simply lay them flat. The key is to make it look abundant and artistic! This not only enhances the flavor combination but also adds a lovely rustic touch to your board.
Fill with Fresh Fruits and Nuts
Now for the fun part—let’s fill in the gaps with fresh fruits and nuts! Scatter the halved strawberries, whole grapes, and sliced kiwi throughout the board. This adds a burst of color that screams spring! I like to tuck the nuts in around the fruits to create a nice balance and texture. Each bite will be a delightful mix of flavors, and trust me, your guests will love it!
Include Crackers and Breadsticks
Don’t forget the crackers or breadsticks! I usually place them around the edges of the board for easy access. You can even create little stacks or fanned-out displays for a fun look. They serve as the perfect vehicle for all those glorious toppings! Plus, it helps make sure everyone can grab a bite without reaching too far.
Add Olives and Hummus
To finish off your board, let’s add some olives and hummus! I like to serve the olives in small bowls to keep them contained and add a pop of color. The hummus can also go in a cute little dish right on the board. This creamy dip is a fantastic complement to the salty meats and crunchy crackers, and it’s great for dipping those fresh veggies, too!
Garnish with Fresh Herbs
Finally, let’s give it that finishing touch with fresh herbs! I love adding sprigs of mint and basil for a beautiful spring vibe. Not only do they look gorgeous, but they also add a lovely fragrance! Just scatter them around the board, and voila! Your stunning spring charcuterie board is ready to impress!
Tips for Success
Creating a gorgeous spring charcuterie board is all about the details! Here are some pro tips to ensure your board looks stunning and tastes delightful, too. Trust me, these little touches can make a big difference!
- Choose a Variety of Colors and Textures: Aim for a mix of vibrant colors and different textures. It makes the board visually appealing and keeps every bite interesting. Think creamy cheeses paired with crunchy nuts and juicy fruits!
- Balance the Flavors: Incorporate a mix of savory, sweet, and tangy items. This balance will keep everyone coming back for more. Pair your rich cheeses with fresh fruits and zesty olives for a flavor explosion!
- Don’t Overcrowd the Board: Leave some space between items to showcase each ingredient. It makes it easier for guests to grab what they want without making a mess. Plus, it lets your beautiful selection shine!
- Prep Ahead of Time: If you’re hosting, consider prepping some ingredients in advance. You can slice cheeses and fruits the night before, making assembly a breeze when it’s time to serve!
- Use Seasonal Ingredients: Take advantage of what’s fresh and in-season. It not only enhances the flavor but also showcases the beauty of spring. Your board will taste amazing and feel connected to the season!
- Keep It Balanced: When placing items, think about weight distribution. For example, heavier cheeses should be on one side while lighter fruits and nuts balance things out on the other. This keeps your board stable and visually appealing!
- Garnish Generously: Fresh herbs aren’t just for looks—they add fragrance and a fresh taste! Don’t skimp on the garnishes; they elevate your board to the next level.
- Have Fun with It: Most importantly, enjoy the process! Let your creativity flow and don’t stress about perfection. The best part of a charcuterie board is sharing delicious food with loved ones!
With these tips in mind, you’ll be well on your way to creating a show-stopping spring charcuterie board that’ll wow your guests and make your gatherings unforgettable!
Variations on Spring Charcuterie Board Ideas
One of the best things about a spring charcuterie board is how versatile it is! You can easily switch up ingredients based on your preferences, the season, or even what you have on hand. Here are some fun variations to inspire your next board:
- Different Cheese Types: If you’re a cheese lover, experiment with different varieties! Try goat cheese for its tangy flavor, blue cheese for a bold kick, or a creamy camembert. Mixing textures like crumbly and creamy will make each bite exciting!
- Switch Up the Meats: Instead of the usual salami and prosciutto, consider adding slices of smoked turkey or chicken for a lighter option. You could even include some spicy chorizo for a kick, or try adding vegetarian options like marinated tofu or smoky tempeh for a plant-based twist!
- Seasonal Fruits: Embrace the freshness of spring by incorporating seasonal fruits. Think about adding juicy peaches, sweet cherries, or even a handful of blueberries! You can also try dried fruits like apricots or figs for a chewy contrast.
- Nutty Varieties: Change up the nuts for extra crunch! Experiment with flavored nuts, such as honey-roasted almonds or spicy cashews. You can even include seeds like pumpkin or sunflower seeds for added texture and health benefits.
- Creative Dips: While hummus is a classic, branch out with different dips! Consider adding a zesty tzatziki, a creamy spinach-artichoke dip, or even a sweet fruit spread like fig jam or honey. These add a whole new layer of flavor to your board!
- Herb Infusions: Don’t stop at just mint and basil! Try adding fresh dill for a unique flavor that pairs well with cheese, or tarragon for a touch of elegance. You can even add edible flowers for a stunning visual appeal!
- Themed Boards: Create themed boards based on cuisines! Think Mediterranean with olives, feta, and pita, or a Mexican-inspired board featuring queso fresco, chorizo, and guacamole. The options are endless and so much fun!
Remember, the key to a fantastic charcuterie board is to have fun and let your creativity shine. Mix and match these variations to create a board that reflects your taste and the joy of spring! Trust me, your guests will love the unique twists you add to this delightful spread.
Nutritional Information Section
As we dive into the deliciousness of our spring charcuterie board, it’s always good to keep an eye on the nutritional side too! Here’s an estimated breakdown of the key nutritional values per serving, which serves about 6-8 people:
- Calories: Approximately 350
- Fat: 25g
- Saturated Fat: 10g
- Unsaturated Fat: 12g
- Trans Fat: 0g
- Cholesterol: 30mg
- Sodium: 600mg
- Carbohydrates: 20g
- Fiber: 3g
- Sugar: 5g
- Protein: 15g
Keep in mind that these values are estimates and can vary based on specific ingredients and portion sizes. It’s a delightful way to indulge without too much guilt. Enjoy every colorful bite of your spring charcuterie board, knowing you’re treating yourself to a mix of flavors and nutrients!
FAQ Section
Got questions about creating the perfect spring charcuterie board? You’re not alone! Here are some common queries I often hear, along with my answers to help you craft a delightful spread that fits your needs:
How can I customize my charcuterie board for dietary restrictions?
Great question! There are so many ways to accommodate dietary needs. For a vegetarian board, skip the meats and add extra cheeses or plant-based proteins like hummus or marinated tofu. If someone is vegan, use nut-based cheeses and more fruits and veggies. You can also swap out nuts for seeds if anyone has nut allergies. Just be sure to check labels on dips and crackers to ensure they’re suitable!
What’s the best way to make a larger charcuterie board?
If you’re hosting a big gathering, scaling up your charcuterie board is easy! Simply multiply the ingredient amounts based on how many guests you’re expecting. Use a larger board or even multiple boards to create a stunning spread. Just remember to keep a good balance of colors and textures. You can also consider adding more variety—think about including different cheeses, meats, and fruits to keep things interesting!
How do I keep my charcuterie board fresh if I’m preparing it ahead of time?
Preparing ahead is totally doable! To keep your board fresh, slice your cheeses and prep your fruits the day before, but store them separately in airtight containers in the fridge. Assemble the board just before serving for the best presentation. If you have leftovers, wrap them up tightly and store them in the fridge to enjoy later. Just remember, some ingredients like fresh fruits may not last as long, so enjoy those first!
Can I use frozen fruits or vegetables on my charcuterie board?
While fresh is always best for flavor and texture, frozen fruits can work in a pinch! Just make sure to thaw them completely and pat them dry to avoid excess moisture on your board. Frozen veggies can be a bit tricky, but if they’re roasted or grilled beforehand, they can add a unique touch to your spread!
What are some creative ways to present my charcuterie board?
Presentation is key! Use colorful plates, wooden boards, or even slate tiles to create an eye-catching display. You can also use small jars for dips and olives, or even add edible flowers for a beautiful spring touch. Arrange ingredients in a way that encourages guests to explore the board—think clusters and shapes rather than just a line! Don’t be afraid to let your creativity shine!
With these FAQs in mind, you’ll be well on your way to creating a fabulous spring charcuterie board that everyone will adore. Happy assembling!
Why You’ll Love This Recipe
- Quick Preparation: With just 15 minutes of prep time, you can whip up this beautiful board without breaking a sweat. It’s the perfect last-minute appetizer for any gathering!
- Colorful Presentation: The vibrant colors of fresh fruits, assorted cheeses, and cured meats create an eye-catching centerpiece that’s sure to impress your guests.
- Seasonal Ingredients: Embracing the best of spring, this charcuterie board highlights fresh, seasonal ingredients that are bursting with flavor, making every bite a delightful experience.
- Versatility for Gatherings: Whether it’s a casual get-together, a picnic in the park, or a fancy dinner party, this board fits any occasion and can be customized to suit different tastes and dietary needs.

spring charcuterie board ideas for a vibrant spring gathering
- Total Time: 15 minutes
- Yield: Serves 6-8 1x
- Diet: Vegetarian
Description
A delightful and colorful spring charcuterie board filled with seasonal ingredients.
Ingredients
- 1 cup assorted cheeses (cheddar, brie, gouda)
- 1 cup cured meats (salami, prosciutto, chorizo)
- 1 cup fresh fruits (strawberries, grapes, kiwi)
- 1 cup assorted nuts (almonds, walnuts)
- 1 cup crackers or breadsticks
- 1/2 cup olives
- 1/2 cup hummus or dip
- Fresh herbs (mint, basil) for garnish
Instructions
- Gather all ingredients on a clean board.
- Arrange cheeses in different sections.
- Add cured meats next to the cheeses.
- Fill spaces with fresh fruits and nuts.
- Place crackers or breadsticks around the board.
- Add olives and hummus in small bowls.
- Garnish with fresh herbs for a spring touch.
Notes
- Use seasonal fruits for freshness.
- Mix textures for a varied experience.
- Consider dietary restrictions when choosing ingredients.
- Prep Time: 15 minutes
- Cook Time: 0 minutes
- Category: Appetizer
- Method: No-cook
- Cuisine: International
Nutrition
- Serving Size: 1 serving
- Calories: 350
- Sugar: 5g
- Sodium: 600mg
- Fat: 25g
- Saturated Fat: 10g
- Unsaturated Fat: 12g
- Trans Fat: 0g
- Carbohydrates: 20g
- Fiber: 3g
- Protein: 15g
- Cholesterol: 30mg
Keywords: spring charcuterie board ideas