Hey there, fellow baking enthusiasts! If you’re on the hunt for something quick, simple, and utterly delightful, let me introduce you to my go-to quick bread recipe. Seriously, it’s a game changer! This recipe is perfect for beginners who might feel a bit intimidated by the world of baking. You won’t need any fancy techniques or hard-to-find ingredients—just your basic pantry staples and a little bit of love.
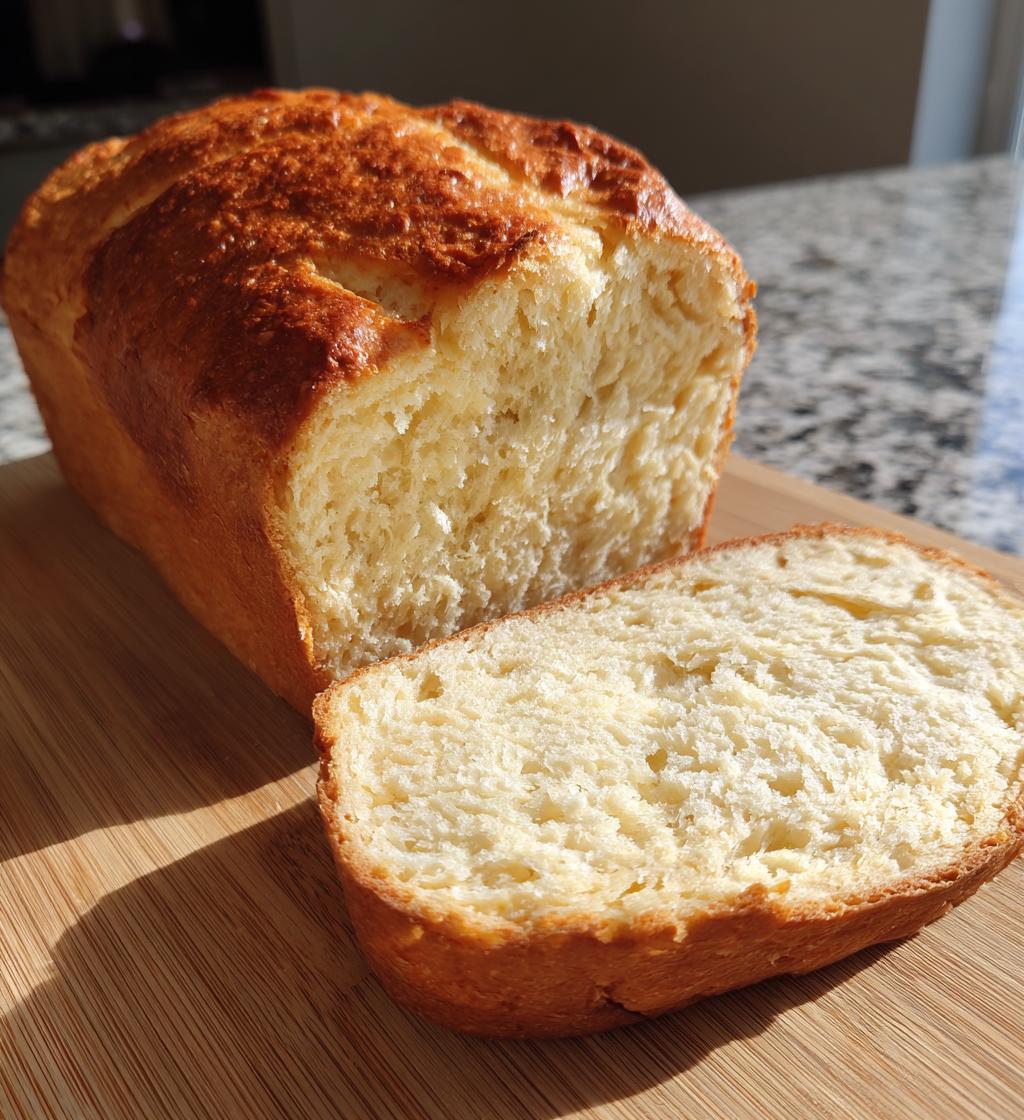
What I love most about quick bread recipes is how effortlessly they come together. In under an hour, you can have a warm, fragrant loaf sitting on your kitchen counter, ready to be sliced and savored. Trust me, nothing beats the smell of freshly baked bread wafting through your home!
This easy quick bread is super versatile, too. You can enjoy it plain, slathered with butter, or even jazz it up with some nuts or chocolate chips if you’re feeling adventurous. It’s the kind of recipe you’ll want to keep in your back pocket for those moments when you need a delicious treat without all the fuss. So, let’s dive right in!
Ingredients List
Gathering the ingredients for this quick bread is a breeze! Here’s what you’ll need:
- 2 cups all-purpose flour: This forms the base of our bread, giving it structure and a delightful texture.
- 1 cup sugar: For just the right amount of sweetness! You can adjust this if you prefer it less sweet.
- 1 tablespoon baking powder: This is what makes the bread rise, giving it that lovely fluffy texture.
- 1/2 teaspoon salt: A pinch of salt enhances all the flavors and balances the sweetness perfectly.
- 1 cup milk: Whole or low-fat works great; it adds moisture and richness to the bread.
- 1/2 cup vegetable oil: This keeps the bread tender and moist. You can also use melted butter for added flavor!
- 2 large eggs: They bind everything together and help with the rise. Make sure they’re at room temperature for the best results!
That’s it! Simple, right? Now let’s get ready to bake that delicious loaf!
How to Prepare Instructions
Alright, let’s get to the fun part—baking your quick bread! I promise, it’s super easy, and you’ll have a scrumptious loaf in no time. Just follow these steps, and you’ll be golden!
- Preheat your oven: First things first, set your oven to 350°F (175°C). This is crucial because you want the oven hot and ready when your batter is mixed and ready to go!
- Mix dry ingredients: In a large bowl, combine the flour, sugar, baking powder, and salt. Give it a good stir with a whisk or a fork to make sure everything is well blended. This step ensures your baking powder gets evenly distributed, which is key for a nice rise!
- Whisk wet ingredients: In another bowl, whisk together the milk, vegetable oil, and eggs until they’re well combined. You want everything to look smooth and a bit frothy—this adds air into the mix!
- Combine wet and dry: Now, pour the wet mixture into the bowl with the dry ingredients. Mix gently until everything is just combined. Don’t overdo it! A few lumps are totally okay; overmixing can lead to a tough bread, and we want it tender and fluffy.
- Pour into loaf pan: Grease a loaf pan with a bit of oil or butter, then pour your batter in. Spread it out evenly—no need to smooth the top perfectly; it’ll level out while baking.
- Bake to perfection: Pop your loaf in the preheated oven and let it bake for 45-50 minutes. You’ll know it’s done when a toothpick inserted into the center comes out clean or with just a few crumbs clinging to it.
- Cool and slice: Once baked, take it out of the oven and let it cool in the pan for about 10 minutes. Then, carefully transfer it to a wire rack to cool completely. Trust me, the waiting is worth it! Once cool, slice it up and enjoy the fruits of your labor!
And there you have it! Simple steps that lead to a delightful quick bread. You’re going to love it!
Why You’ll Love This Recipe
This quick bread recipe has so much going for it, and I can’t wait to share why it’s become a staple in my kitchen. Here are just a few reasons you’ll adore it:
- Quick Preparation: With just 10 minutes of prep time, you can have your batter ready to bake. It’s perfect for those busy mornings or last-minute gatherings!
- Simple Ingredients: You likely have everything you need in your pantry already. This recipe doesn’t call for any fancy ingredients—just the basics!
- Delicious Results: The taste is absolutely divine! This bread is soft, fluffy, and just sweet enough to satisfy your cravings without being overwhelming.
- Versatile Options: Feel free to customize it! Toss in some nuts, chocolate chips, or even fruits like bananas or blueberries for added flavor and texture.
- Perfect for Any Occasion: Whether you’re serving it at brunch, as a snack, or even for dessert, this quick bread fits in perfectly anywhere!
Seriously, once you try this recipe, you’ll see why it’s a favorite in my home. Enjoy every moment of baking and, of course, the delicious results!
Tips for Success
Now that you’re all set to whip up this delicious quick bread, let me share some pro tips to ensure your loaf turns out perfectly every single time! Trust me, these little nuggets of wisdom can make a big difference.
- Don’t skip the preheating: Preheating your oven is a must! It ensures that your bread starts baking at the right temperature, which is key for proper rising. If you toss your batter into a cold oven, you might end up with a dense loaf instead of the fluffy goodness you’re aiming for!
- Measure your flour correctly: Flour can be tricky! Make sure to spoon it into your measuring cup and level it off with a knife. Don’t scoop straight from the bag; that can compact the flour and lead to using too much, which can make your bread dry.
- Mix gently: When combining your wet and dry ingredients, remember to mix just until combined. Overmixing can lead to gluten development, which results in a tough loaf. You want it light and airy, so don’t stress about a few lumps!
- Check for doneness: Baking times can vary based on your oven, so keep an eye on your bread as it nears the end of the baking time. If you’re unsure, the toothpick test is your best friend! Just insert it into the center of the loaf; if it comes out clean or with a few moist crumbs, you’re good to go!
- Let it cool: Patience is key here! Allow your bread to cool in the pan for about 10 minutes before transferring it to a wire rack. This helps it set and makes slicing easier. If you slice it too early, it might crumble or fall apart!
By keeping these tips in mind, you’ll be well on your way to baking a quick bread that’s not just easy, but absolutely irresistible! Happy baking!
Variations
One of the best things about this quick bread recipe is its versatility! You can easily customize it to suit your taste or use up ingredients you have on hand. Here are some fun variations to try:
- Banana Bread: Swap out some of the sugar for ripe mashed bananas to create a moist banana bread. About 1 cup of mashed bananas works wonders!
- Nutty Delight: Add in 1 cup of chopped nuts, like walnuts or pecans, for a delightful crunch. Just be sure to chop them up coarsely so they’re evenly distributed throughout the loaf.
- Chocolate Chip Heaven: Stir in 1 cup of chocolate chips for a sweet treat that’s perfect for dessert or a snack. You can use semi-sweet, dark, or even white chocolate for a fun twist!
- Cinnamon Swirl: Mix in 1 teaspoon of ground cinnamon into your dry ingredients, and then create a swirl by layering half the batter in the pan, sprinkling with a cinnamon-sugar mixture, and topping with the remaining batter.
- Fruity Flavor: Toss in about 1 cup of your favorite berries, like blueberries or raspberries, to brighten up the flavor. Just make sure they’re fresh or lightly frozen to avoid excess moisture!
- Citrus Zing: For a refreshing twist, add the zest of one lemon or orange to the batter. This brightens up the flavor and adds a lovely aroma while it bakes.
Feel free to mix and match these ideas or come up with your own creative spins! The possibilities are endless, and that’s what makes this quick bread recipe so much fun to make. Happy experimenting!
Storage & Reheating Instructions
Alright, so you’ve baked your delicious quick bread and are probably wondering how to keep it fresh for as long as possible. Don’t worry, I’ve got you covered! Proper storage and reheating can make a world of difference in enjoying your bread at its best.
First off, to store any leftovers, let your quick bread cool completely on a wire rack. This is super important because trapping heat can make your bread soggy—and nobody wants that! Once it’s cool, wrap it tightly in plastic wrap or aluminum foil to keep it from drying out. If you want to store it longer, you can pop it into an airtight container. It’ll stay fresh for about 3-4 days at room temperature, or you can refrigerate it for up to a week.
Now, if you’re looking to keep it for an even longer time, I highly recommend freezing your quick bread. Just slice it first! Wrap each slice individually in plastic wrap or place them in a freezer-safe bag. This way, you can grab a slice whenever you’re in the mood for a tasty snack. Frozen quick bread can last up to 3 months, and trust me, it’s totally worth it!
When you’re ready to enjoy some of that frozen goodness, simply remove the slices from the freezer and let them thaw at room temperature for about 30 minutes. If you’re craving it warm, pop the slices in the microwave for about 10-15 seconds. You can also toast them for a delightful crispy edge—yum! Just keep an eye on them so they don’t get too toasty.
So go ahead and bake a big batch! With these storage and reheating tips, you’ll always have a slice of warm, delightful quick bread ready to enjoy whenever the craving strikes. Happy baking and snacking!
Nutritional Information Section
Now, let’s talk about the nutritional aspects of this delightful quick bread. Each slice is packed with flavor and just the right amount of sweetness, making it a perfect treat! Here’s a basic breakdown of what you can expect:
- Serving Size: 1 slice
- Calories: 200
- Sugar: 10g
- Sodium: 150mg
- Fat: 8g
- Saturated Fat: 1g
- Unsaturated Fat: 7g
- Trans Fat: 0g
- Carbohydrates: 32g
- Fiber: 1g
- Protein: 3g
- Cholesterol: 30mg
Keep in mind that these values can vary based on the specific ingredients and brands you use, so consider this as a general guide rather than an exact measurement. Enjoy the baking, and remember, a slice of this quick bread is a lovely way to treat yourself!
FAQ Section
Got questions about quick bread recipes? Don’t worry, I’ve got answers! Here are some of the most common questions I hear, along with the insights I’ve gathered from my own baking adventures.
- Can I use whole wheat flour instead of all-purpose flour? Absolutely! Whole wheat flour is a fantastic option for a healthier twist. Just keep in mind that it may create a denser loaf, so you might want to mix it with a bit of all-purpose flour for a lighter texture.
- What if I don’t have baking powder? If you find yourself out of baking powder, you can make a substitute using baking soda and vinegar! For each teaspoon of baking powder needed, use 1/4 teaspoon of baking soda and 1/2 teaspoon of vinegar. Just mix them in with your wet ingredients.
- Can this recipe be made vegan? Yes, you can easily adapt it! Substitute the eggs with flax eggs (1 tablespoon of ground flaxseed mixed with 2.5 tablespoons of water equals one egg). For the milk, any plant-based milk will work just fine, and you can swap the vegetable oil with coconut oil for added flavor.
- How do I know when my quick bread is done baking? Great question! The toothpick test is your best friend here. Insert a toothpick into the center of the loaf; if it comes out clean or with a few moist crumbs, your bread is ready! Additionally, look for the edges pulling away from the pan—a good sign it’s baked through.
- Can I freeze the quick bread? Yes, you can! Just slice the bread first, wrap each slice tightly in plastic wrap, and then store them in a freezer-safe bag. It’ll keep well for up to 3 months. When you’re ready to enjoy, let them thaw at room temperature or pop them in the microwave for a quick warm-up!
I hope this clears up some of your questions! Remember, baking is all about experimenting and having fun, so don’t hesitate to make this quick bread your own. Happy baking!
Print
quick bread recipes easy: 7 Simple Steps to Deliciousness
- Total Time: 1 hour
- Yield: 1 loaf 1x
- Diet: Vegetarian
Description
A simple and quick bread recipe for beginners.
Ingredients
- 2 cups all-purpose flour
- 1 cup sugar
- 1 tablespoon baking powder
- 1/2 teaspoon salt
- 1 cup milk
- 1/2 cup vegetable oil
- 2 large eggs
Instructions
- Preheat the oven to 350°F (175°C).
- In a bowl, mix flour, sugar, baking powder, and salt.
- In another bowl, whisk milk, oil, and eggs together.
- Combine wet and dry ingredients until just mixed.
- Pour the batter into a greased loaf pan.
- Bake for 45-50 minutes or until a toothpick comes out clean.
- Let cool before slicing.
Notes
- Store leftovers in an airtight container.
- Can add nuts or chocolate chips for extra flavor.
- Use whole wheat flour for a healthier option.
- Prep Time: 10 minutes
- Cook Time: 50 minutes
- Category: Bread
- Method: Baking
- Cuisine: American
Nutrition
- Serving Size: 1 slice
- Calories: 200
- Sugar: 10g
- Sodium: 150mg
- Fat: 8g
- Saturated Fat: 1g
- Unsaturated Fat: 7g
- Trans Fat: 0g
- Carbohydrates: 32g
- Fiber: 1g
- Protein: 3g
- Cholesterol: 30mg
Keywords: quick bread recipes easy