Ah, springtime! The flowers are blooming, the sun is shining, and it’s the perfect season for celebrations filled with joy and flavor. There’s just something about this time of year that makes me want to whip up something truly special and vibrant. That’s where my favorite spring cake designs come in! These delightful creations not only taste amazing but also bring a burst of color and creativity to any gathering. Whether you’re celebrating a birthday, a baby shower, or simply welcoming the season, these cakes are sure to impress your guests and brighten up your table.
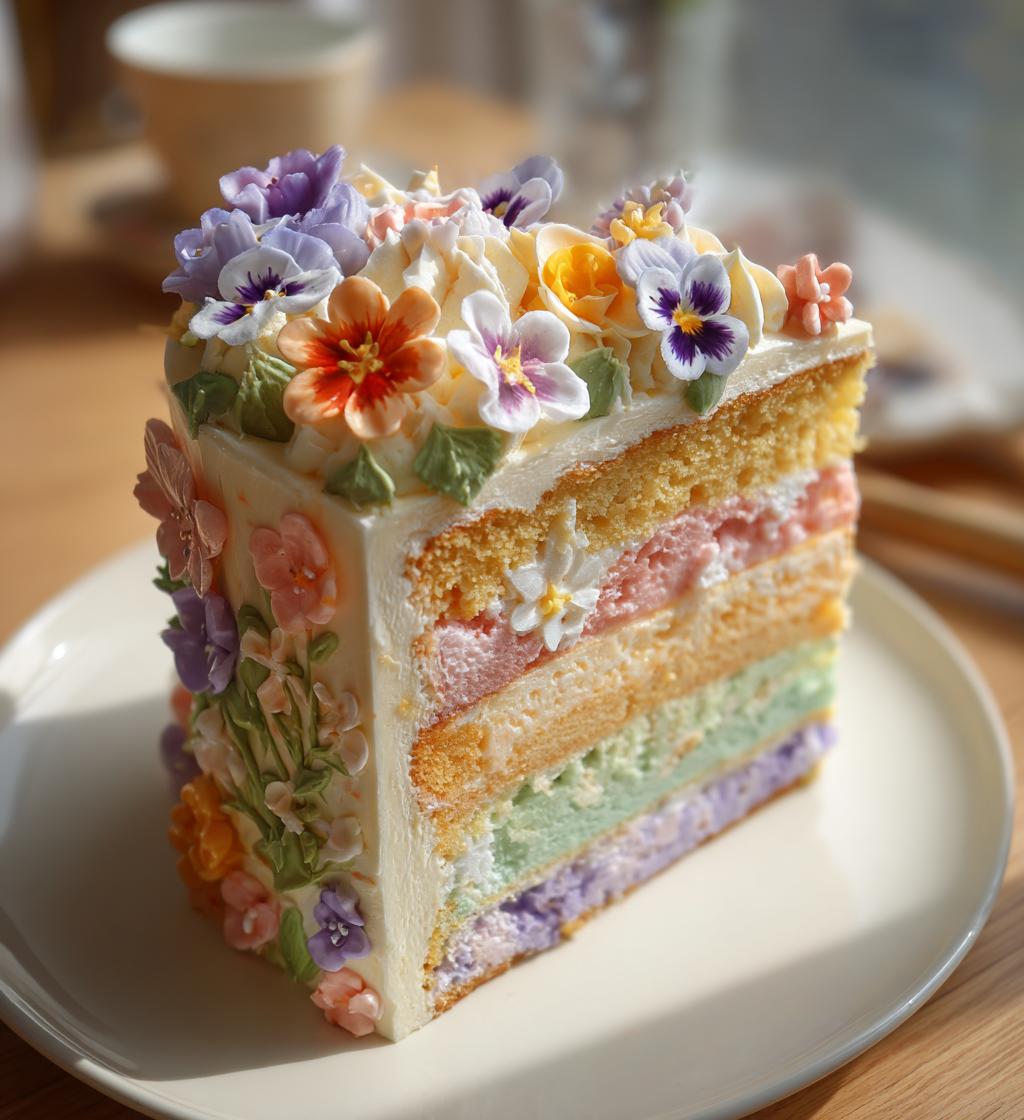
Imagine a cake layered with pastel colors, topped with delicate edible flowers, and adorned with whimsical fondant decorations. Trust me, nothing says “spring” quite like a stunning cake that captures the essence of the season. Plus, making these cakes is a fun way to let your creativity shine! I’m excited to share my go-to recipe and tips for crafting the most delightful spring cakes. So grab your apron, and let’s get baking!
Ingredients List
Gathering the right ingredients is the first step to creating a show-stopping spring cake! Here’s what you’ll need:
- 2 cups all-purpose flour: This forms the base of your cake, giving it structure and stability.
- 1 cup granulated sugar: Sweetness is key! This adds a delightful flavor and moisture.
- 1 cup unsalted butter: Make sure it’s softened for easy creaming, which helps create that fluffy texture.
- 4 large eggs: They bring richness and help bind everything together.
- 1 cup milk: This adds moisture and a tender crumb.
- 2 tsp baking powder: This is your leavening agent, ensuring the cake rises beautifully.
- 1 tsp vanilla extract: A splash of vanilla enhances all the cake’s flavors.
- 1/2 tsp salt: Just a pinch to balance the sweetness.
- Food coloring (various colors): For adding that vibrant spring flair!
- Fondant for decorations: Get creative with your design – it’s easy to work with!
- Edible flowers: These add a stunning, natural touch to your cake.
With these ingredients at your fingertips, you’ll be ready to bring your spring cake designs to life!
How to Prepare Instructions
Now, let’s dive into the joyful process of bringing your spring cake to life! Follow these steps carefully, and you’ll have a beautiful cake that’s bursting with spring colors and flavors.
Prepping the Oven and Pans
First things first, let’s get that oven ready! Preheat it to 350°F (175°C). This is super important because a preheated oven ensures your cake rises perfectly. While the oven is warming up, grease and flour your cake pans. I like to use a little butter on the sides and bottom, followed by a dusting of flour. This helps the cakes release beautifully once baked. Trust me, you don’t want your masterpiece to stick!
Mixing the Batter
Now it’s time to mix! In a large bowl, whisk together your flour, baking powder, and salt. Set this aside. In another bowl, cream the softened butter and granulated sugar together until it’s light and fluffy. This step is crucial for achieving that delightful texture, so take your time – about 3 to 5 minutes should do the trick! Next, add the eggs one at a time, making sure to mix well after each addition. This helps everything blend smoothly. Finally, stir in the vanilla extract and milk, mixing just until combined. Now, gradually add your dry ingredients to the wet mixture, folding gently until no flour streaks remain. Don’t overmix, or you’ll end up with a dense cake!
Coloring the Batter
Let’s make this cake pop with color! Divide the batter into separate bowls, depending on how many colors you want to use. Start with a few drops of food coloring in each bowl, then gently fold the colors into the batter until you achieve your desired shades. You can go for pastels for a soft look or vibrant hues for a bold statement – it’s all up to you! Just remember to keep the colors light and cheerful, perfect for spring!
Baking the Cakes
Pour the colored batter into your prepared pans, making sure to alternate colors if you’re creating layers. Bake them in the preheated oven for about 25-30 minutes. You’ll know they’re done when a toothpick inserted in the center comes out clean or with just a few moist crumbs. Once baked, let the cakes cool in the pans for about 10 minutes before transferring them to wire racks to cool completely. This cooling step is important – if you frost too soon, the frosting might melt, and no one wants a soggy cake!
Frosting and Decorating
Once your cakes are completely cooled, it’s time to frost! I like to use a simple buttercream frosting for my spring cakes. Spread a generous layer on top of one cake layer, then stack the next on top. Repeat until all layers are stacked. For the final touch, cover the entire cake with frosting. Now, here comes the fun part! Roll out your fondant to create beautiful decorations, or simply place edible flowers on top for a fresh, elegant look. Don’t be afraid to get creative and let your imagination run wild. Your cake should be as unique as your celebration!
Why You’ll Love This Recipe
There are so many reasons to adore this spring cake recipe! Here are just a few:
- Easy to Follow: The step-by-step instructions make it simple, even for beginner bakers. You’ll feel like a pro in no time!
- Customizable Designs: With various colors and decorations, you can create a cake that fits any spring celebration, from Easter brunch to birthday parties.
- Deliciously Moist: The combination of butter and eggs ensures a moist and tender crumb that everyone will love.
- Perfect for Sharing: This cake yields 12 generous servings, making it ideal for gatherings with family and friends.
- Fun for All Ages: Involve the kids in the decorating process—it’s a fantastic way to spark creativity and make sweet memories together!
Trust me, once you try this recipe, it’ll become your go-to for all spring festivities!
Tips for Success
To ensure your spring cake turns out absolutely perfect, here are some tried-and-true tips that I swear by:
- Room Temperature Ingredients: Make sure your butter, eggs, and milk are at room temperature before mixing. This helps them blend together more seamlessly, giving you a fluffier cake.
- Don’t Overmix: When combining your dry and wet ingredients, mix just until combined. Overmixing can lead to a dense texture, and nobody wants that!
- Check for Doneness: Besides the toothpick test, look for a slightly springy top and edges that pull away from the pan. If you have a little patience, your cake will reward you with a perfect rise!
- Experiment with Flavors: Want to add a twist? Try mixing in lemon zest or almond extract for a unique flavor profile that screams spring.
- Practice Your Decorating: If fondant is new to you, practice rolling it out on a clean surface with powdered sugar. It’s a great way to build confidence for your cake’s final look!
With these tips in your back pocket, you’ll be well on your way to creating a stunning spring cake that will wow everyone!
Nutritional Information Section
As you indulge in this delightful spring cake, it’s good to know what you’re enjoying! Here’s the estimated nutritional information per serving (1 slice):
- Calories: 350
- Fat: 15g
- Saturated Fat: 10g
- Trans Fat: 0g
- Cholesterol: 80mg
- Sodium: 150mg
- Carbohydrates: 50g
- Fiber: 1g
- Sugar: 25g
- Protein: 5g
Keep in mind, these values are estimates and can vary based on your specific ingredients and portion sizes. Enjoy every delicious bite with this knowledge in mind!
FAQ Section
Got questions about my spring cake designs? Don’t worry, I’ve got you covered! Here are some common queries I hear, along with my answers:
Q1: Can I use different types of flour?
Absolutely! While all-purpose flour is my go-to, you can experiment with cake flour for a lighter texture or even gluten-free flour if needed. Just keep in mind that the texture and flavor might vary slightly.
Q2: How do I store leftover cake?
To keep your cake fresh, wrap it tightly in plastic wrap and store it in the refrigerator. It should last for about 3-4 days. You can also freeze slices for up to a month—just make sure to wrap them well!
Q3: Can I make this cake ahead of time?
Definitely! You can bake the cakes a day in advance and store them in the refrigerator. Just frost and decorate them on the day of your celebration for best results.
Q4: What if I don’t have fondant?
No problem at all! You can use whipped cream or buttercream frosting to decorate your cake. Just make sure your frosting is thick enough to hold its shape if you’re going for decorative designs.
Q5: Can I use store-bought frosting?
Sure! If you’re short on time, store-bought frosting works perfectly. Just pick a flavor that compliments your cake, and you’ll still end up with a delightful spring dessert!
Hope this helps clear up any questions you had about bringing your spring cake designs to life!
Serving Suggestions
Serving your stunning spring cake is just as important as baking it! I love pairing it with a light, refreshing fruit salad that complements the cake’s sweetness. Think strawberries, blueberries, and a hint of mint to brighten things up. For beverages, a chilled glass of lemonade or a floral herbal tea works beautifully. If you’re feeling fancy, a sparkling rosé adds a touch of celebration! Trust me, these pairings will elevate your cake experience and make your spring festivities even more delightful.
Print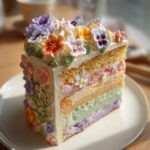
spring cake designs: 7 Vibrant Creations to Dazzle Your Table
- Total Time: 1 hour
- Yield: 12 servings 1x
- Diet: Vegetarian
Description
A collection of creative spring cake designs that add a touch of seasonal flair to your celebrations.
Ingredients
- 2 cups all-purpose flour
- 1 cup granulated sugar
- 1 cup unsalted butter
- 4 large eggs
- 1 cup milk
- 2 tsp baking powder
- 1 tsp vanilla extract
- 1/2 tsp salt
- Food coloring (various colors)
- Fondant for decorations
- Edible flowers
Instructions
- Preheat the oven to 350°F (175°C).
- Grease and flour your cake pans.
- In a bowl, mix flour, baking powder, and salt.
- In a separate bowl, cream butter and sugar until light and fluffy.
- Add eggs one at a time, mixing well after each addition.
- Stir in vanilla extract and milk.
- Gradually add dry ingredients to the wet mixture.
- Divide the batter into separate bowls and color as desired.
- Pour the batter into the prepared pans and bake for 25-30 minutes.
- Cool the cakes in the pans for 10 minutes, then transfer to wire racks.
- Once cooled, frost and decorate with fondant and edible flowers.
Notes
- Use seasonal colors for a spring theme.
- Consider adding layers for a more dramatic look.
- Can be made ahead of time and frozen.
- Prep Time: 30 minutes
- Cook Time: 30 minutes
- Category: Dessert
- Method: Baking
- Cuisine: American
Nutrition
- Serving Size: 1 slice
- Calories: 350
- Sugar: 25g
- Sodium: 150mg
- Fat: 15g
- Saturated Fat: 10g
- Unsaturated Fat: 5g
- Trans Fat: 0g
- Carbohydrates: 50g
- Fiber: 1g
- Protein: 5g
- Cholesterol: 80mg
Keywords: spring cake designs, seasonal cakes, cake decoration