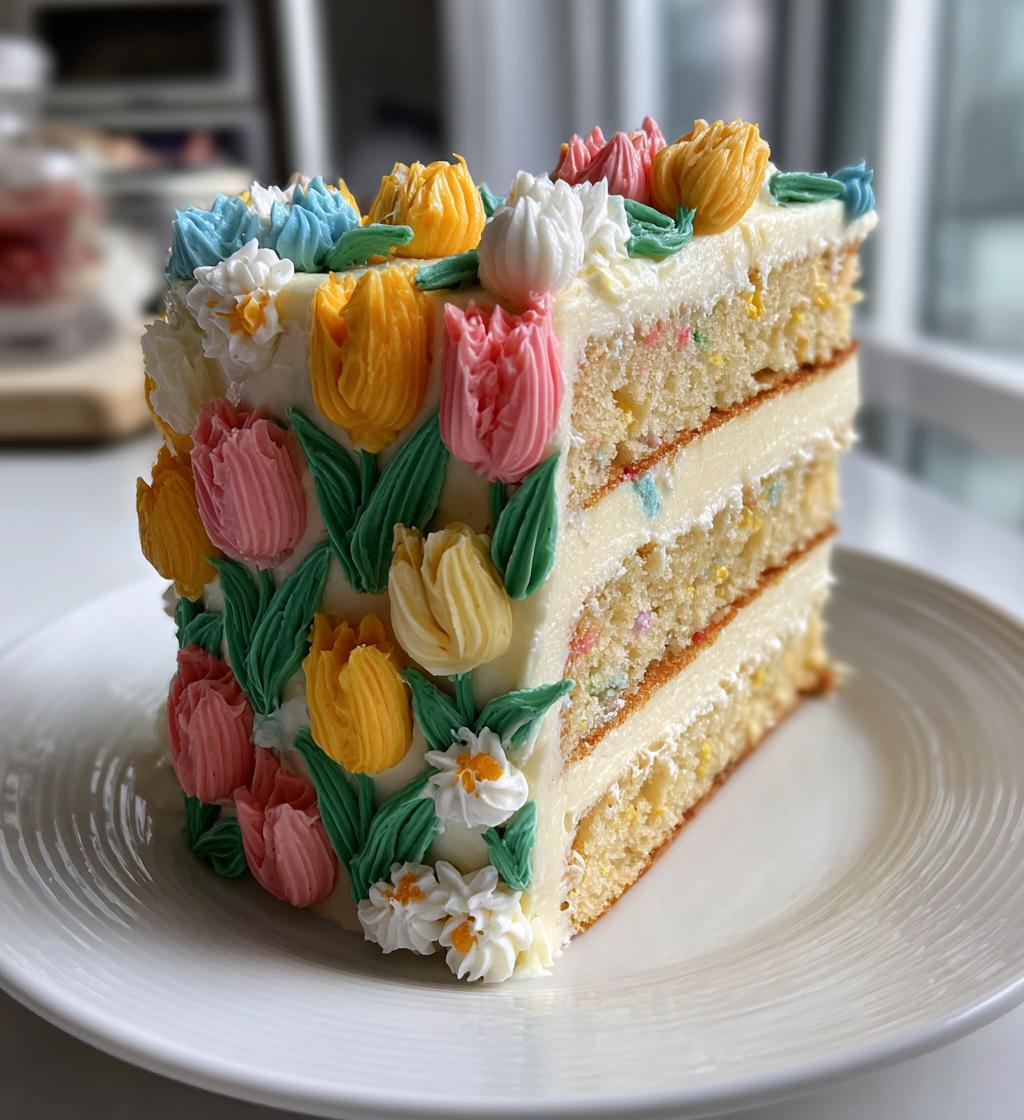
Ah, spring! It’s that magical time of year when flowers bloom, birds sing, and everything feels fresh and new. I can’t help but get excited about all the beautiful flavors and colors that come with the season. One of my absolute favorite ways to celebrate this vibrant time is by making a stunning spring tulip cake! This delightful dessert is not just a feast for the taste buds, but a feast for the eyes too, with its bright colors and floral designs that remind us of nature’s beauty. Trust me, there’s something so joyful about slicing into a cake that looks like a garden in full bloom!
Whether you’re hosting a spring gathering or just want to brighten up your day, this spring tulip cake is sure to impress. The soft, buttery layers are so inviting, and when you top it with fluffy buttercream frosting and a splash of color, it transforms into a centerpiece that everyone will rave about. So, grab your mixing bowls and let’s dive into this deliciously fun adventure of baking!
Ingredients for Spring Tulip Cake
To create this stunning spring tulip cake, you’ll need a few basic ingredients that come together to make something truly special. Here’s what you’ll want to gather:
- 2 cups all-purpose flour: This forms the foundation of the cake, giving it structure and a lovely crumb.
- 1 1/2 cups granulated sugar: Sweetness is key! This will help balance the flavors and keep the cake moist.
- 1 cup unsalted butter, softened: Make sure it’s soft but not melted! This is crucial for that fluffy cake texture we all love.
- 4 large eggs: Eggs add richness and help bind the ingredients together, ensuring a tender crumb.
- 1 cup milk: This adds moisture and helps create a smooth batter. Whole milk works best for richness!
- 2 teaspoons baking powder: This is your leavening agent, helping the cake rise beautifully in the oven.
- 1 teaspoon vanilla extract: A hint of vanilla enhances all the flavors, making your cake taste even more delightful.
- Food coloring (various colors for decoration): This is where the fun begins! Use gel food coloring for vibrant hues that will bring your tulip designs to life.
- Buttercream frosting: A must-have for decorating! You can make your own or grab some from your favorite bakery.
Once you have all these ingredients ready, you’ll be all set to whip up a cake that not only celebrates the beauty of spring but also tastes absolutely divine. Let’s get baking!
How to Prepare Spring Tulip Cake
Now that you’ve gathered all your ingredients, it’s time to roll up your sleeves and dive into the fun part—preparing your spring tulip cake! Follow these clear steps to ensure your cake turns out as beautiful as it is delicious. Let’s get started!
Preheat and Prepare Pans
First things first, you’ll want to preheat your oven to 350°F (175°C). This step is super important because a properly preheated oven ensures your cake rises beautifully and bakes evenly. While that’s heating up, grab your two 9-inch round cake pans and grease them well with butter or non-stick spray. Then, dust them lightly with flour. This helps the cakes release easily without sticking. Trust me, there’s nothing worse than a cake that won’t come out of the pan!
Mix Dry Ingredients
Next, it’s time to mix your dry ingredients. In a medium bowl, combine the 2 cups of all-purpose flour and the 2 teaspoons of baking powder. Whisk them together until they’re fully blended. This step is crucial because it ensures the baking powder is evenly distributed throughout the flour, which helps your cake rise uniformly. You don’t want any pockets of baking powder lurking around!
Cream Butter and Sugar
Now, let’s cream the butter and sugar together. In a large mixing bowl, beat the 1 cup of softened unsalted butter and 1 1/2 cups of granulated sugar. Use a hand mixer or stand mixer on medium speed for about 3-5 minutes until the mixture is light and fluffy. This step is magic! It incorporates air into the batter, giving your cake that delightful, airy texture. Remember, the fluffier the butter and sugar mix, the lighter your cake will be. You want it to look pale and almost billowy!
Combine Wet Ingredients
Next up, it’s time to add in the eggs and vanilla. Crack in the 4 large eggs one at a time, mixing well after each addition. This allows each egg to fully incorporate into the mixture. Then, add in the 1 teaspoon of vanilla extract for that lovely flavor boost. Mix until everything is smooth and creamy. You’re creating a luscious, velvety batter that will be the heart of your cake!
Alternate Adding Dry Ingredients and Milk
Now comes the fun part—combining your dry ingredients and milk! Start by adding about a third of the flour mixture to your wet ingredients, mixing on low speed just until combined. Then, pour in the 1 cup of milk and mix again. Repeat this process—adding another third of the flour, mixing, then the remaining milk, and finally the last bit of flour. This alternating method prevents overmixing, which can result in a dense cake. You want your batter to be smooth and silky, so just mix until you see no more dry flour!
Bake the Cakes
Once your batter is ready, it’s time to pour it into the prepared pans. Divide the batter evenly between the two pans and smooth the tops with a spatula. Pop them in your preheated oven and bake for about 25-30 minutes. You’ll know they’re done when a toothpick inserted into the center comes out clean or with just a few moist crumbs. Keep an eye on them towards the end, as oven temperatures can vary!
Cool and Decorate
After baking, let the cakes cool in the pans for about 10 minutes. This allows them to firm up a bit, making them easier to remove. Then, carefully turn the cakes out onto wire racks to cool completely. Once cooled, it’s time to have some fun decorating! Spread a generous layer of buttercream frosting on top of one cake layer, stack the other on top, and let your creativity shine with food coloring to create those beautiful tulip designs. This is where your cake really comes to life, and I can’t wait for you to see the final result!
Why You’ll Love This Recipe
This spring tulip cake isn’t just a treat for your taste buds; it’s a celebration of everything wonderful about the season! Here’s why I think you’re going to adore making (and eating) this cake:
- Easy Preparation: With straightforward steps, even novice bakers can whip up this beauty without stress. It’s all about mixing and layering!
- Vibrant Presentation: The colorful tulip decorations will wow your guests and make any occasion feel special. It’s like bringing a garden to your table!
- Delicious Flavor: The combination of buttery cake and creamy frosting is simply irresistible. Each bite is a delightful balance of sweetness and richness.
- Perfect for Celebrations: Whether it’s a spring gathering, birthday, or just a treat for yourself, this cake is sure to shine as the centerpiece.
- Customizable: Feel free to get creative with flavors! Add lemon zest for a zesty kick or play around with different food coloring to suit your style.
Trust me, once you taste this cake, you’ll understand why it’s become one of my go-to recipes to celebrate the joyous season of spring!
Tips for Success
Ready to make your spring tulip cake an absolute showstopper? I’ve got some pro tips that’ll help you achieve the best results and elevate your baking game. Let’s dive in!
- Use gel food coloring: Trust me, gel food coloring is a game changer! It gives you those vibrant, eye-popping colors without altering the cake’s consistency. Just a little goes a long way, so you can create stunning tulip designs that really pop!
- Consider adding lemon zest: If you want to take your cake to the next level, try adding a tablespoon of fresh lemon zest to the batter. It adds a delightful zing that brightens up the flavors and complements the sweetness beautifully. You’ll be amazed at how a little citrus can elevate the whole cake!
- Don’t skip the cooling time: I know it’s tempting to frost your cake right away, but patience is key! Allow the cakes to cool completely on wire racks before decorating. This prevents the frosting from melting and ensures a beautiful finish. Plus, it gives the flavors time to settle!
- Use a cake leveler: To achieve that perfectly flat cake layer, consider using a cake leveler or serrated knife to trim the tops. It’ll make stacking and decorating so much easier, and your cake will look professional!
- Experiment with decorations: Have fun with your tulip designs! You can use different piping techniques to create various textures and effects. Try adding green buttercream for leaves or even edible glitter for a touch of sparkle. The possibilities are endless!
With these tips, you’ll not only make a stunning spring tulip cake, but you’ll also impress everyone with your baking skills. I can’t wait for you to try it!
Nutritional Information
Curious about what’s in this delicious spring tulip cake? Here’s a breakdown of the estimated nutritional information for one slice, based on typical values. This will help you enjoy your cake while keeping an eye on those nutritional goals!
- Calories: 350
- Fat: 15g
- Saturated Fat: 9g
- Unsaturated Fat: 4g
- Trans Fat: 0g
- Cholesterol: 70mg
- Sodium: 200mg
- Carbohydrates: 50g
- Fiber: 1g
- Sugar: 25g
- Protein: 4g
Keep in mind, these values are estimates and can vary based on your specific ingredients and portion sizes. But regardless of the numbers, I promise each slice is filled with joy and flavor, making it worth every bite! Enjoy your baking adventure!
FAQ About Spring Tulip Cake
Got questions about this delightful spring tulip cake? Don’t worry, I’ve got you covered! Here are some common queries that might pop up, along with my trusty answers to help you out:
How should I store leftover spring tulip cake?
To keep your cake fresh, store any leftovers in an airtight container at room temperature for up to 3 days. If you need to keep it longer, you can refrigerate it for up to a week. Just make sure to let it come to room temperature before serving again, as the flavors really shine when it’s not too cold!
Can I freeze the spring tulip cake?
Absolutely! If you want to prepare ahead, you can freeze the un-frosted cake layers. Just wrap them tightly in plastic wrap and then in aluminum foil to prevent freezer burn. They’ll keep well for up to 3 months. When you’re ready to enjoy, let them thaw in the fridge overnight, then frost and decorate as desired.
What variations can I try with this recipe?
The beauty of this recipe is its versatility! You can switch up the flavors by adding lemon or orange zest to the batter for a citrusy twist. If you’re feeling adventurous, consider folding in some mini chocolate chips or nuts for added texture. You can even layer different flavors, like vanilla and almond, to create a unique combination!
Can I make this cake gluten-free?
Yes, you can! To make a gluten-free version of the spring tulip cake, simply substitute the all-purpose flour with a 1:1 gluten-free baking blend. Just make sure to check that all other ingredients, especially the baking powder and food coloring, are gluten-free as well. It might take a little trial and error, but it’s totally doable!
How can I achieve more vibrant colors in my tulip designs?
For those bright, eye-catching tulip designs, I highly recommend using gel food coloring instead of liquid. Gel coloring packs a punch and won’t alter the consistency of your buttercream frosting. Start with just a small amount and add more until you reach your desired shade. Mixing colors can be fun too—experiment to create your own unique palette!
If you have any more questions, feel free to reach out! I love helping fellow bakers, and I can’t wait for you to create your own stunning spring tulip cake. Happy baking!
Print
spring tulip cake: 5 Joyful Steps to Bake Beauty
- Total Time: 1 hour
- Yield: 12 servings 1x
- Diet: Vegetarian
Description
A delightful spring tulip cake that celebrates the season’s beauty.
Ingredients
- 2 cups all-purpose flour
- 1 1/2 cups granulated sugar
- 1 cup unsalted butter, softened
- 4 large eggs
- 1 cup milk
- 2 teaspoons baking powder
- 1 teaspoon vanilla extract
- Food coloring (various colors for decoration)
- Buttercream frosting
Instructions
- Preheat your oven to 350°F (175°C).
- Grease and flour two 9-inch round cake pans.
- In a bowl, mix flour and baking powder.
- In another bowl, cream butter and sugar until light and fluffy.
- Add eggs one at a time, mixing well after each addition.
- Add vanilla extract and mix.
- Gradually add flour mixture and milk, alternating between each.
- Pour batter into prepared pans.
- Bake for 25-30 minutes or until a toothpick comes out clean.
- Let cakes cool in pans for 10 minutes, then remove and cool completely on wire racks.
- Decorate with buttercream frosting and food coloring to create tulip designs.
Notes
- Use gel food coloring for vibrant colors.
- Store leftovers in an airtight container.
- For added flavor, consider adding lemon zest to the batter.
- Prep Time: 30 minutes
- Cook Time: 30 minutes
- Category: Dessert
- Method: Baking
- Cuisine: American
Nutrition
- Serving Size: 1 slice
- Calories: 350
- Sugar: 25g
- Sodium: 200mg
- Fat: 15g
- Saturated Fat: 9g
- Unsaturated Fat: 4g
- Trans Fat: 0g
- Carbohydrates: 50g
- Fiber: 1g
- Protein: 4g
- Cholesterol: 70mg
Keywords: spring tulip cake, seasonal dessert, floral cake